NEDCC Staff
NEDCC
Andover, MA
introduction
Surface cleaning is a technique that can be considered both maintenance and active conservation. Deciding what to remove and whether removal is necessary is the first step; understanding what is involved can help make the decision more straightforward.
Although it is not always necessary or desirable to remove all surface deposits from old papers, surface cleaning can improve the appearance of an artifact. Surface cleaning can also remove substances that might eventually cause damage through abrasion, transfer, acidity, or recurring mold growth.
Surface cleaning is a non-water or non-solvent based technique for reducing or removing surface deposits on paper-based materials. Surface cleaning can be an independent treatment or a technique done prior to further treatments (for example, mending) to prevent any deposits from becoming embedded in the paper fibers. Surface cleaning will not remove heavy soiling or staining that has become embedded in the paper such as tide lines, mold staining, or mat burn.
Surface cleaning can be suitable for removing:
- dirt
- dust
- soot
- mold
- accretions (sticky or waxy deposits that have built up on the surface)
- insect droppings
When and how to Clean
The first step whenever surface cleaning is under consideration is to ask the question: Should the item be cleaned?
Asking this question involves considering a number of other questions:
- Will any historic evidence be removed in surface cleaning such as fingerprints or smudges on artwork?
- Is the item brittle, photographic, or a piece of fine art that can be damaged with even light cleaning?
- Do bound volumes need to be supported during surface cleaning with a cradle or foam book wedges to avoid stressing the binding?
If the answer to any of these questions is yes, cleaning should not proceed without assistance and/or consultation.
However, if the paper items are stable, strong, and no evidential material will be removed or damaged during cleaning, the next step is to assess what sort of material you will be cleaning off and how best to remove it. To determine if any damage will result from cleaning, perform a low-impact test. Choose and clean a small, unobtrusive area to see if there are any negative reactions: removal—or smearing—of inks or graphite, damage to the paper surface, or tears in the paper.
In addition, before you attempt the following procedures, practice them on expendable objects to test your comfort level with undertaking this treatment step and eventually working on an original artifact. If you are unsure of any of these techniques, be cautious. With any object of value to your collection, a “First, do no harm” approach is best.
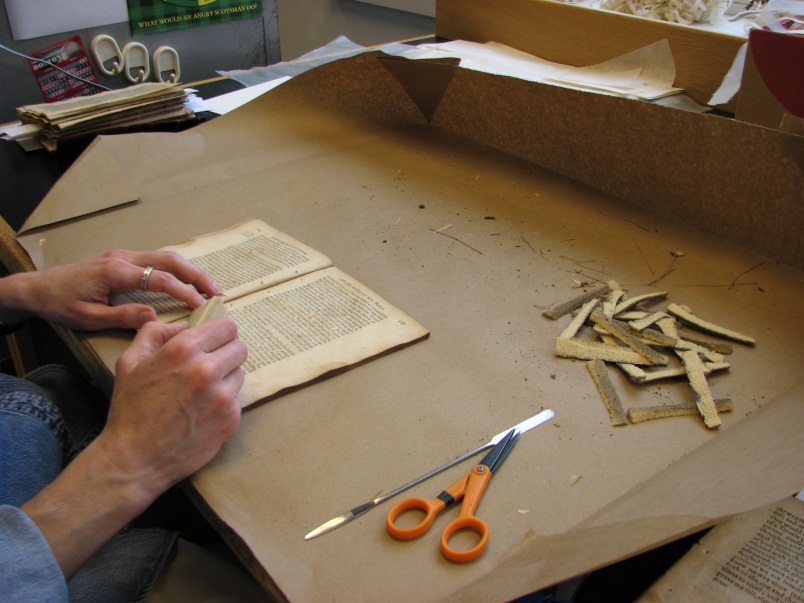
Once you’ve decided to begin, clear a large work surface and cover the majority of that space with a sheet of blank newsprint or other un-inked paper that can be changed frequently as it becomes soiled. To help contain the dirt, the paper can be folded at the edges and stapled at the corners to form a three-walled space for easy clean-up, as shown in the photo below.
 |
Begin cleaning by gently brushing the surface of an object with a soft brush to remove loose dirt and dust. If soiling is heavy, brush debris into a HEPA vacuum with cheesecloth over the nozzle to catch any bits of paper that may come loose accidentally. Do not apply the vacuum hose directly onto the object. Brush both sides of the sheet. If the item is soiled with soot or mold, do not use a brush but proceed to the methods described below in “Suggested Applications.”
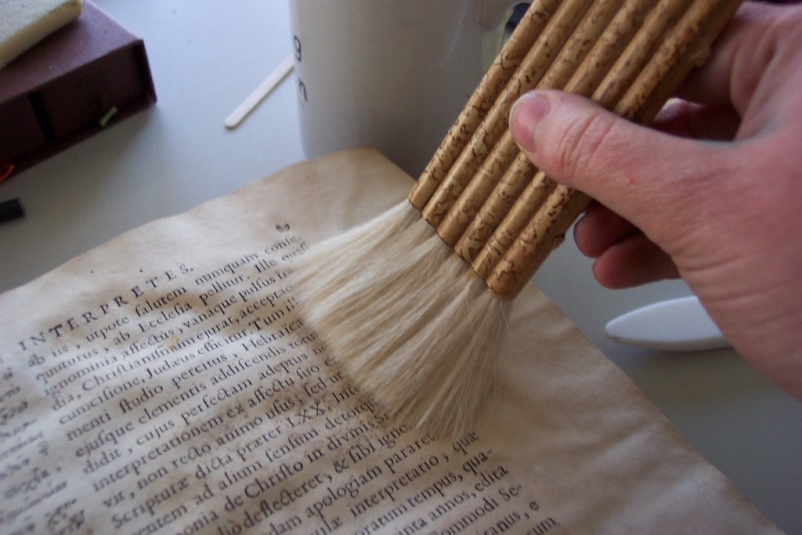 |
| Brushing the surface. Image from Flickr user fenchurch. CC. |
NOTE: If your object contains powdery media such as pastel or charcoal, or flaking paint or ink, a brush isn’t appropriate.
To avoid enlarging tears, brush carefully in the direction of the tear from the inside out and not perpendicularly across it. Finally, any cleaning over stamps, seals, labels, and any other adhered pieces (like collage) should be undertaken with an especially light touch and extra care.
Cleaning Materials
Because several erasing compounds commonly found in library supply and archival catalogs are primarily intended for use by graphic designers and architects, they are not suited to historic documents and works of art. Many of these products come in cloth bags that release small amounts of granules as they are rubbed across the surface of the paper, in containers of granules to be sprinkled on the surface of the paper and rubbed with the hand, or putty-like blocks that pick up dirt. These granules are abrasive and can damage the paper fibers. In addition, the putty can pick up ink, graphite, pastels, gouache, or other colorants if they are not firmly attached to the paper. All are also chemically unstable and can lead to damage if they become embedded in the paper fibers during surface cleaning (granules) or leave behind residue (putty). The electric erasers found in many institutions are also unsuitable for your historic collections.
Suitable tools have specific qualities that make them safe:
- Brushes: For all surface cleaning procedures, a clean, soft, natural bristled brush is needed. A good rule is that a surface cleaning brush should be soft enough to use on your face or the back of your hand. Brushes intended for surface cleaning should not be used for wet work, and any brushes used on moldy materials should be thoroughly cleaned after use and not used for any other purpose.
- HEPA Vacuum: When soiling is heavy or might include mold, a brush can be used in combination with a high efficiency particulate air (HEPA) filtered vacuum. HEPA vacuums with variable speed air control are preferred to prevent high suction from damaging collection materials.
-
Surface cleaning (or soot) sponges: These vulcanized rubber sponges were originally developed for soot removal following a fire and have been found to be very effective tools for surface cleaning paper. These sponges are for surface use only and are not the same as those sold as chemical sponges.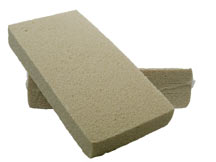
- Vinyl erasers: Grated vinyl eraser “crumbs,” such as from the non-colored Staedtler Mars Plastic Eraser, can be used for surface cleaning and are available from conservation suppliers in ground form. Grated vinyl erasers will not leave behind deposits when properly removed from the surface of the paper. Erasers should not be used in their block form due to their abrasiveness and the potential for over-cleaning.
Suggested Applications
Once the first step of brushing off any loose dirt or debris is complete (mold is not included in this step), consider the type of material you are trying to remove and select the best cleaner for that application. Most dirt-type coatings will simply need surface cleaning sponges or erasers; soot, for example, will require a surface cleaning sponge. (For other types of surface material, see the section on “Cleaning Specific Substances.”)
FLAT PAPER
Small, localized deposits of dirt may be reduced by gentle rubbing with a surface cleaning sponge or a piece of a vinyl block eraser. When using the latter, cut the eraser into a wedge, pencil-point, or whatever will result in the best cleaning shape for this piece. Rub in short, random strokes to avoid creating a pattern of straight erased lines and be sure to check the surface of the paper periodically to be sure it is not being abraded.
Cleaning should always be done from the interior toward the outside to prevent catching the edge of the paper and tearing it, as well as to encourage detritus to move off the surface. When the sponge or eraser becomes dirty, trim off the soiled portion before you continue. If no soil comes off onto the sponge or eraser, do not continue: overworking one area can result in damage to the paper fibers and even tearing. When surface cleaning locally, be careful not to over-clean and cause the rest of the object to look dirtier in contrast. Try to avoid rubbing over media, whether printed or drawn, as this can remove original material and can potentially smudge some lower-quality printing inks. To help avoid these areas, barriers of polyester film (Melinex) or paper can be used. When cleaning around a tear for mending, a polyester guard can be put over one side of the tear to prevent any more damage to the already fragile fibers.
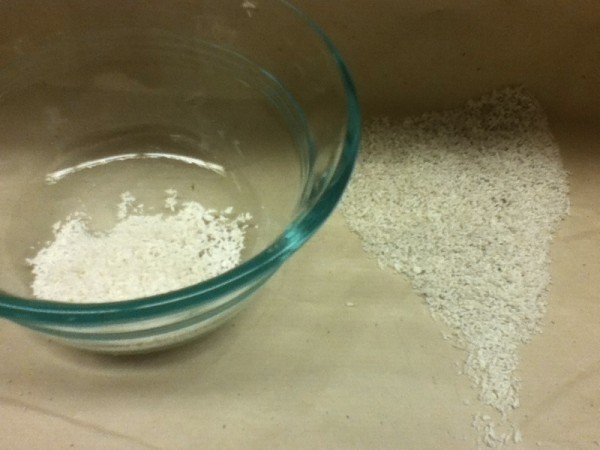 |
| Grated vinyl eraser crumbs before and after surface cleaning.Credit: Jackie Divis Doyle, Binding Obsession 01-23-2012 |
As noted in the “Cleaning Materials” section above, block erasers are not appropriate for cleaning larger expanses of paper, but grated vinyl erasers are. These eraser “crumbs” can be used on most printed surfaces; however, eraser granules should not be used in books as they become trapped in the gutter. To test the efficacy of the granules, pour a small amount on a small, unobtrusive spot and gently roll the granules in a circular motion with the fingertips (while wearing nitrile or vinyl gloves). If the cleaning is effective, the granules will rapidly become gray in color. Once you’re sure the granules are actually removing dirt, clean the rest of the surface in the same manner, brushing away the crumbs when they reach a dark gray color. When brushing crumbs, be sure to get any crumbs that may be below the item as well as those on the surface.
Soot can be deceptive and may initially appear to be dirt. If the surface dirt appears to smear or smudge rather than be picked up during cleaning, it is likely that the soiling is soot. Soot should be removed with a surface cleaning sponge using a straight up-and-down motion (no horizontal, side-to-side rubbing) working across a document. The sponge is designed to pick up the soot and hold onto it and thus prevent smearing. Just as when you’re removing dirt, trim off the soiled portion of the sponge as it becomes dirty and continue with the cleaning process until the sponge does not pick up any more soot.
BOUND VOLUMES
Closed books on the shelf normally require only cleaning on the exterior. However, under certain circumstances, pages in bound volumes may require your attention:
- If the pages are cockled
- If the books were shelved without sufficient support
- If the books have been stored in a library with a fireplace
- If the books arrive already dirty as part of a donation.
Dirt, dust, and soot will normally accumulate most heavily at the top of the book and along the edges of the pages. Coarser dirt and mold may accumulate in the gutter and down the interior of the spine of case-bound books. Care should be taken when cleaning books with deckled edges, fore edge painting, and those with brittle paper or fragile bindings.
There are a number of important differences between cleaning flat paper and paper as part of a book. Closed books are best cleaned with an untreated dust cloth or a variable speed vacuum on a low setting. Using the brush attachment and a piece of cheesecloth between the attachment and the nozzle, gently brush the top of the book from the spine towards the fore edge, being careful not to catch the endband. A separate, soft-bristled brush may be used to direct dirt toward the nozzle if the binding or paper is very fragile. (For more information on cleaning bindings, see NEDCC Leaflet 4.3, Cleaning Books and Shelves.)
When cleaning the textblock of a bound volume, the book should be supported with foam cradles or some other soft support. Surface cleaning sponges are the best choice for the textblock, and work should always progress from the gutter outward in a sunburst pattern. This helps not only to prevent detritus from accumulating in the gutter but also to prevent tearing on the edge of the paper. Material that has accumulated in the gutter over time (or accidentally during surface cleaning) can be easily removed with a soft brush.
Cleaning Specific Substances
MOLD
Moldy materials are obvious candidates for surface cleaning, but it is important to note that only inactive mold should be surface-cleaned. To deactivate mold, house the materials in an environment of low relative humidity (below 50 percent) or wrap in waxed paper and freeze for 48 hours. Mold removal requires special precautions to avoid spreading spores to other materials and to prevent allergic reactions. Be sure to work in an isolated location with the proper protective equipment. (Ideally, this work is best left to a professional conservator or brought to a vendor that offers disaster-recovery services. For more details on mold removal, see NEDCC Leaflet 3.8 Emergency Salvage of Moldy Books and Papers.)
STICKY DEPOSITS/ACCRETIONS
Surface removal of sticky deposits (often called “accretions” when the source is not known) can be considered a type of surface cleaning. The most common of these sticky deposits are the adhesives from pressure-sensitive tapes. Other accretions can include wax droplets, food deposits, dead insects, and other unknown materials.
Adhesives from pressure-sensitive tapes damage paper and can cause pages to stick together or to enclosures, as in the case of cold flow of adhesive from under the tape carrier. Gently rub sticky adhesive residues with numerous extremely short strokes of a rubber cement pick-up. This can be time-consuming, but numerous gentle strokes eventually ball-up the adhesive without damaging the paper. Then, pick the adhesive off the eraser with the fingers. If the paper is too fragile to withstand this sort of treatment, interleave pages with silicon release paper or use cellulose powder on the residue.
As they age, some pressure-sensitive tape carriers fall away and leave thick, hardened adhesive residues. These residues, although unsightly, are not an immediate hazard. Tape removal, as a general rule, is complicated and a professional conservator should be consulted before attempting any removal in-house.
Sticky deposits from other sources may be encouraged to release from the paper with the point of a needle or a microspatula. Regardless of the implement used, be very careful to remove only the accretion and not the underlying paper fibers. For crusty accretions, it may be enough to first apply a light downward pressure in order to fracture the accretion, which can then simply be removed with a brush.
Special Considerations
INSECT DROPPINGS AND OTHER DEPOSITS
Insect excretions and rust deposits, such as those left by rusted paper clips, are not only disfiguring but also the source of ongoing damage to the paper. These materials are very difficult to remove and advice or training should be sought from a conservator before attempting removal in-house.
MATERIALS SUSCEPTIBLE TO DAMAGE FROM SURFACE CLEANING
Brittle newspapers, photographs, and fine art might be harmed by inexpert attempts at surface cleaning. Brittle newspapers are often so fragile that any pressure on the surface will cause them to fracture into many small pieces that are almost impossible to repair. Photographic surfaces can be very fragile and easily abraded by the removal of dust, dirt, soot, etc.
Works of art in any media that are not firmly bound to paper (pastel, pencil, or charcoal) might be smeared by cleaning, or the media removed. Often, these friable materials cannot withstand surface cleaning at all. Examination of paints and thicker inks under magnification may reveal minute flaking not obvious to the naked eye which could be accidentally removed by an eraser or sponge. Artifacts with hand-applied coloring are particularly vulnerable to changes in how the light reflects off them and to transfer, smudging, or change of color. Cleaning of all such delicate objects should be left to a professional conservator.
CONCLUSION
Surface cleaning can benefit books, documents, and works of art by improving their appearance and preventing the damage that dirt, dust, soot, adhesives, and accretions can continue to cause. As with any new skill, practice and repetition will improve results. It is best to practice on non-collection items to become comfortable with the techniques prior to surface cleaning any items in the collection. As with anything that involves the actual treatment of an object, consult with a professional conservator if you have any questions.
RESOURCES
American Institute for Conservation of Historic and Artistic Works (AIC)
Find a Professional
http://www.conservation-us.org/membership/find-a-conservator
Paper Conservation Catalog: Surface Cleaning
http://www.conservation-wiki.com/wiki/Surface_Cleaning
Balloffet, N., J. Hille, and J. A. Reed. (2005).
Preservation and conservation for libraries and archives.
Chicago: American Library Association. 84-5.
The British Library Preservation Advisory Committee
Cleaning books and documents (online booklet)
https://www.bl.uk/britishlibrary/~/media/bl/global/conservation/pdf-guides/cleaning-preservation-guide.pdf
NEDCC Preservation Leaflets
3.8 Emergency Salvage of Moldy Books and Papers
https://www.nedcc.org/free-resources/preservation-leaflets/3.-emergency-management/3.8-emergency-salvage-of-moldy-books-and-paper
4.3 Cleaning Books and Shelves
https://www.nedcc.org/free-resources/preservation-leaflets/4.-storage-and-handling/4.3-cleaning-books-and-shelves
Ritzenthaler, Mary Lynn. (2010).
Preserving archives & manuscripts.
Chicago: Society of American Archivists. 425-29.
COPYRIGHT STATEMENT
© 2007. Revised 2012 and 2019. NEDCC Northeast Document Conservation Center. All rights reserved.